Following the driest March–July period since 1921 across central England, water availability in the region remains significantly below average. To help conserve increasingly limited water resources, protect canal infrastructure and ecology, and prolong navigation elsewhere on the network, Tardebigge Lock Flight will be open under navigation restrictions from Wednesday 27th August. This date aligns with the expected completion of repairs to Tardebigge Top Lock.
Passage will be permitted between 8:30 am and 3:00 pm, with the last entry at 12:00 noon. Boaters are reminded that the final opportunity to turn around before ascending the flight is just after Lock 23.
We will continue to manage the limited water situation and will provide updates if conditions change. Despite the measures we’re taking, there may be extreme local circumstances that require us to take immediate action to temporarily close some stretches to navigation.
If sufficient rainfall occurs to allow safe navigation, restrictions will be lifted immediately. However, this is likely to require sustained and prolonged rainfall over several weeks, rather than a single heavy downpour.
Thank you for your continued support in reducing water use across the network and for reporting leaks or concerns via 0303 040 4040 or our Contact Us page
It has taken just over 2 years, but we now have 5000 locations on our maps and we are still going strong. Please use the Canal and River Maps menu above to explore what is around you when you travel on the UK waterways.
We also have nearly 18,000 members of our Facebook group
We log all our engine hours in a book with a running total, I know I have a gauge for this, but in a book I can note down anything else that happens and it reminds me when I need to do a service.
At or about 250 hours we change all the filters, I would rather be early that late with this as it is an old engine and while currently working fine, I want to keep it that way.
We got our last batch of filters from Online Filters I have found them to be quick and efficient, I always order double what I need for the service, filters are cheap so it seems best to keep some stock onboard.
For our IZUSU IM 4LC38 diesel engine I ordered the following filters
The oil we use is the recommend 15W/40 which came from Smith & Allan Lubricants (can be ordered from Amazon, but direct is just as quick and may well be cheaper). I ordered the 20 Litres pack as this should give me enough oil for engines 6.7 Litres and the gearbox 1.7 Litres for 2 complete changes.
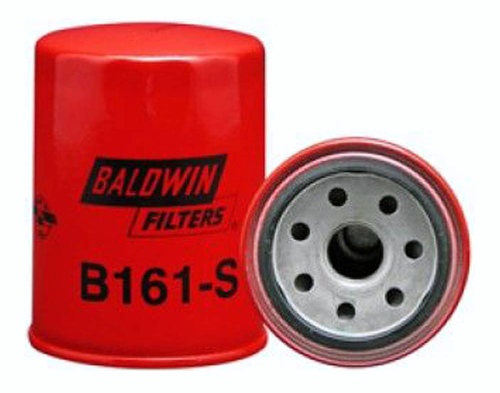
Baldwin B161-S from Online Filters
A tool that may well be needed at this points is a ‘Draper Redline 100mm Oil Filter Strap Wrench‘ which, after operations on both thumbs over the years, has come in very handy for these modern cartridge filters.
The Engine Oil Filter
First we need to warm the engine so that the oil is warm and flowing, a few minutes of gentle running on tick over should do this. If your engine is hot already, probably best to give it 30 mins to cool down first, it is easy to get burned when playing with a hot engine.
Now is a good time to recommend and place an Oil and Fuel Absorbent Pad under the engine to collect any spills
Now we can drain the oil. On our Isuzu 42 we have a pump for draining the engine sump (in a boat it is much harder, if impossible to get below the engine to collect the oil)
Once the oil is drained we can remove the oil filter, that is when you may need the oil filter strap wrench.
Remove and carefully discard the filter, check the rubber seal has come off with the filter, then clean the mating surface on the engine is clean.
Using some clean oil, lightly lubricate the rubber seal on the oil filter.
Screw the filter in place hand tight, then with the oil filter strap wrench tighten it a further ¼ to ½ turn.
Now replace the oil, being careful not to over fill the engine, do not just pour in the full 6.7 Litres, add some oil via the oil filler, then check the level with the dip stick, remember it takes a while for the oil to flow to the engines sump (so take your time) give it a few minutes for the oil to sink down. Note: An over filled engine with increase oil pressure and may prematurely age your engine.
The Fuel Filter
Our boat has a flow and return pipe from the high pressure diesel pump and near the tank are two taps that are normally in the ‘on’ position, before changing the fuel filter these need to be turned off.
The fuel filter on our boat is a cartridge type, and looks similar to the oil filter, again you may need the oil filter strap wrench to loosen it, diesel will leak out, so wear gloves (You can normally find some in a petrol station near the diesel pump, I usually pick up an extra pair when needed, they are very thin but do the job).
Also remember to put down an Oil and Fuel Absorbent Pad under the filter before trying to remove it, I put my old filters into a zip lock bag for disposal at out local domestic waste centre, they cannot be disposed of in domestic rubbish.
Replacing the filter is the same as the engine oil filter, clean the surfaces, lightly oil the rubber seal on the filter and tighten hand tight, and then a ¼ to ½ a turn more using the oil filter strap wrench.
Our boat is also fitted with a fuel Agglomerator (AKA a water separator), which is used to collect water in the glass (in our case) container below the pipe, the diesel floats on water so passes through the filter while the water drops into the bowl and can be removed by either removing the bowl or unscrewing a drain plug in the bottom.
Do remember to turn on the fuel taps, else things will not go well when starting the engine .
The Air Filter
The Air Filter is nice and easy to change, just three spring clips to remove the lid and a quick swap of the filter. I would normally only changes this every 2nd oil service, but I do check it each time.
Changing the Gearbox oil PRM 150
Our boat is fitted with a Newage PRM 150 gearbox, this uses the same oil as the engine 15W/40 and takes about 1.7 Litres.
First we need to remove the dip stick/ oil filler plug with a 19 mm spanner .
Under the gearbox is a sump plug that also uses a 19 mm spanner to remove, but before removal you will need to find a container big enough but also small enough to fit under the gearbox to collect the oil.
Once drained, clean the sump plug and its washer, as well as the mating surface on the gearbox and refit hand tight and then pinch tight with a socket.
Now fill with oil slowly vis the dipstick hole, checking the amount with the dipstick as needed.
NOTE: Having said all the above, my oil was last changed after just 250 hours usage and the oil looked like new, so we decided not to change it this time.
Other basic checks
At this point, we also check for any loose bolts and wear and tear in the prop shaft and its couplings, then check the engine mounts bolts and any other ancillaries that are bolted on. Also check any cables and pipes for chaffing where they pass through bulkheads and finally look at the exhaust pipe for leaks (generally obvious due to black soot marks).
We did find that one of the alternators was loose and the long 130mm bolt was very warn, so this is also being replaced.
Basic service is now complete for another 250 hours
Thanks to:-
My thanks goes to Steve Cowham of STC Marine Engineering, without whom I would not have been able to watch him do all the hard work while I recover from an operation on my left hand.