Knowing when to pump-out before it to late?

Finding the simplest solution

This seems to be the biggest problem we have is knowing when the tank is nearly full, we know. when it is full the the toilet will not flush away.. but that always seems to late and always always after we have passed a pump-out point a few miles back.

Most Basic Flush Counter?

So I have looked at sensors I can add to the tank, sensors that need to be put in the tank seem to be a bad idea, I would have to make a hole in the tank to fit them and anything floating in poo is probably not going to be reliable for long.

I have looked has ultra sonic style sensors, but most of these do not like a stainless steel tank, or are extremely expensive.

So our current solution is as simple as it can get, we know the rough capacity of the tank 545 litres , and the volume of a flush is 4 litres, if we add a little extra for the solid and liquid waste 1 litre, we can estimate the number of flushes we can do before we get to ¾ full. NOTE: These are estimated volumes based on the manual we have, we also have to remember a pump-out is never 100%, there is always some residual waste left in the tank.

 Holding tank size 545 L
Water used per flush (seen est. 2-4 L per flush) 4 L
Waste products per flush 1 L
Total per flush = 5 L
Max number of possible flushes (545/5) = 109 Flushes
¾ Full flushes 82 Flushes

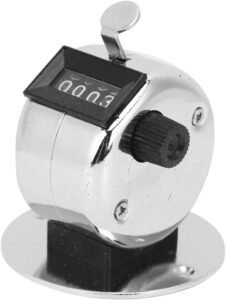
At this point we want to start looking for a pump-out, so from Amazon.co.uk we have ordered a clicker counter/tally counters that we will press each time we flush.

The cost is about £5-£8 I went for the one with the base plate so it can be left on the shelf above the flush button..

We will let you know how we get on with this, it is all estimates at the moment!

Planning for Solar Panels – Part 1

We are hoping in a couple of years to take a gap year! all out kids will have either left home or be at Uni, so time for old’s to go on an adventure. To enable us not to have to run the engine to charge the batteries, we are looking at solar panels.

On our latest trip to the boat I took some measurements of the available space on the roof that we could use for solar panels, we cannot use the area behind the centre line point as we have ropes and mounting for the pole, boat hook and our plank.

I have been looking at large panels that can deliver 400+ watts, this make the roof more difficult to walk on, but with just two fitted we can still layout on the roof and watch the stars and we don’t tend to walk on the roof, the knees won’t take the jump down.

This diagram is based on using two 415W Perlight Delta panels, which are 1719mm long x 1140mm wide and 30mm thick. I am hoping that a combined 830W will give me enough power in the summer, while providing some still usable power in the winter (More on my calculations in a future post).

We currently have two 12v TV’s (not often both used, but one in the bedroom and one in the lounge) , a 12V fridge, 240V washing machine, a hungry 3500W inverter, LED Lighting, water pumps, internet wifi/router, laptops and phones and about 400 Ah of lead acid batteries, so about 200 Ah usable power (an upgrade to Lithium will come one day).

We want to plan ahead and have more supply than we currently need, hoping to cover us for future needs and upgrades.

Next I want to find mountings that will go as low as possible, but still enable us to angle the panels for better output, especially in winter when the sun is low to the horzion.

Also see
Planning for Solar Panels – Part 1
Planning for Solar Panels Part 2 – Panel Mounting Options
Planning for Solar Panels Part 3 – Types of Panels
Planning for Solar Panels Part 4 – MPPT vs PWM solar controllers
Planning for Solar Panels part 5 – Cable sizes, lengths and resistance.
Planning for Solar Panels part 6 – Panels in Serial or Parallel
Planning for Solar Panels part 7 – Buying the cable and Circuit breakers
Planning for Solar Panels part 8 – Buying Solar Panels and Mountings
Planning for Solar Panels part 9 – Wiring
Planning for Solar Panels part 10 – Drilling, Tapping and Fitting

Safety Disclaimer

New Macerator Pump Fitted

A couple of weeks ago we visit the Marina fit more new curtains and measure the roof to find the best options for solar panels. Unfortunately we found the toilet was not working as expected, it would flush, but after flushing there would be more water in the bowl that expected, and after a second flush it would increase again.

We tried cleaning the toilet and using a plunger to push the water into the tank, but we could not resolve the problem and so had decided put it off to another visit, when I would have more time and tools.

On the way home I decided to texted Steve Cowham, who had come to our rescue fitting the water pump in the summer, I have poorly thumbs and am trying to save myself from further operations, luckily Steve was able to take a look and soon called me back.

Tecma 12V Silence / Elegance Macerator PumpHis suggestion was that the Macerator Pump had probably worn out, having been an X-Black Prince hire boat for 12 years, it would have been well used. He was happy to fit one for us and recommend we order one from Midland Chandlers the part we needed was a “Tecma 12V Silence / Elegance Macerator Pump” part number TG-224.

This was ordered and shipped directly to Steve via the marina, at £249.50 they are not cheap, but they need to work.

A few days later it is all fitted and working, we will be back to the boat soon and I am sure we will be testing it.

Steve, don’t forget to send us the bill, thanks 🙂

Winter Frost Protection Year 2

Last year we set the boat up with two thermostats, a normal one that controls the Eberspächer D4W diesel heater when we need it, initially the heating was just a switch on/off. I also fitted a frost thermostat both of these have a switch so they can be taken out of circuit.

Frost Thermostat
Frost Thermostat

So this year we made sure the diesel tank was fully topped up switch in the frost thermostat as low as I could above freezing (about 2°C).

Update Feb 2023 – This seems to have worked well again this year, we have used a few gallons of diesel, but the boat seems to be free of any frost damage.

The Hull Blacking Experiance

We decided we should get the hull blacked, as we did not wish to leave it too long and end up with more problems. I had checked around on the boat forums and Facebook groups so I had an idea of the costs involved.

We had initially planned to get the boat hauled out and do the work ourselves, all part of the boating experience, so we went to the Marina office to ask the costs etc, by the time we left we had decided to let them do everything.

We even went for 3 coats for extra protection. The cost including everything was estimated to be about £1200.00 Inc VAT.

After our chat I was very sure they would do a better job than me, far quicker, and with much less pain and effort on my part. The plan was they would move the boat to the slipway, load her onto a trailer and pull he out to be placed on blocks.

Stripped, ready for painting

After they cleaned up the hull ready for blacking, they noticed some pitting about midway along the hull, nothing major, but would recommend checking carefully next time. A recommendation was to fit some slim extra anodes fore and aft of this area, as you can see below. Fitting these cost an about £275 on the final invoice.

Blacked with extra anodes fitted

All looking good, she is ready to go back in the water

Back on the trailer

Slipped back onto the trailer and heading to the slipway

Back in the water

Now back in the water, it is an impressive trailer

All done with a tractor

As you can see, all done with the trusty aide of a tractor.

The final bill was £1507.70 including the new anodes.

Droitwich Spa Marina did an excellent job as far as we could judge, passing on the notes about pitting gives us more options for when we do this again. I must thank them for all the pictures and care they took with our boat.