In May 2021 we fitted a Huawei B311 as our internet connection, and at first we used a SMARTY SIM to get access to the internet on there 100GB for £20, but my Daughter soon used that all in the first week of our holiday and the cost of extra GB was stupid!!!, and they would not let me upgrade to a larger data plan until the first month was complete..
So we moved to EE as part of our Family tariff and during this time we put our Daughter on an unlimited data tariff (£££).
SMARTY Unlimited
Well now we are back with SMARTY as they have a unlimited Data/Calls/Texts tariff SIM for just £18 per month, and so far no problems, this enables me to update the Moorings Map Page while we are travelling and not worry about watch a film etc etc.
If you are interested we have a referral link https://i.smarty.co.uk/TWt5bGx but you may find better offers if you shop around.
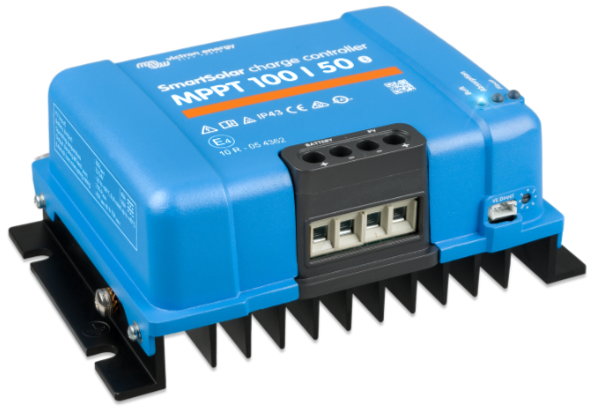
Having used the Victron MPPT sizing calculator with the correct configuration for my 2 X 415W solar panels it recommended I use their SmartSolarMPPT 100/50, if you follow the link above you should see the calculation.
Victron SmartSolar 100|50
So I was now on the hunt for the best price I could find; I tried all the normal boating solar companies, but the prices are all very similar when I found on eBay for just £220.00
*Prices Include VAT and where checked at the time of writing 07/06/2023
So the order was placed. Things got a little odd when I got a message from DPD, and it seemed they had been booked for delivery, but had not got the package, even after a few days this status did not change. I messaged the supplier via eBay with no response, but then an email from Royal Mail with shipping details arrived and a few days later it was here.
I must admit I was starting to get a little worried that it was too cheap to be true, but I have it, it is new and sealed in the box ready to be fitted in a few weeks. Now I need to find a similar bargain for the Solar Panels!
NOTE: In the package came a leaflet from Nomadic Leisure, the company that run the Nomadic Conversions eBay shop their main market seems to be Campervans and surprisingly on their online shop the SmartSolar MPPT 100/50 is £302.40
So it seems it is a good idea to shop around and try alternative sources like eBay. You may, like me, get a bargain.
We need to look at the wiring options for fitting the our Solar Panels, they can be wired in multiple ways, each with it advantages and dis-advantages. With our current plan for a two large 415W panels we have two main options we can wire them in Series or in Parallel. If we fit more smaller 200W panels to get to our 800W target we can also use a hybrid wiring option.
Panels in Series or Serial Wiring
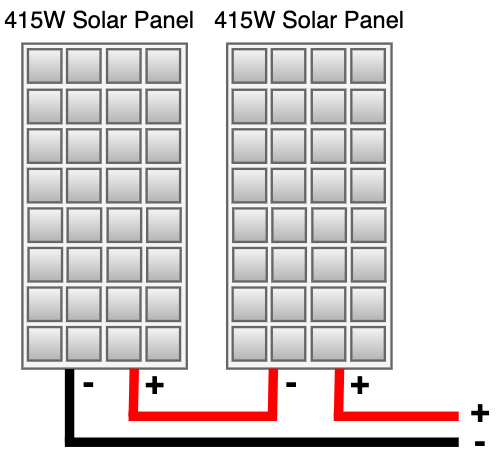
In the example below I have wired the panels in series so that the output of one panel goes to the input of the next panel.
Solar Panels Series Wiring Diagram
In this example each panels can output up to 38.9 Volts and 10.62 Amps, by putting them in series we combine the voltages (2 X 38.9 = 77.8V), but the Amps will stay the same at 10.62A.
Giving an output of 826 Watts (77.8 Volts X 10.62 Amps = 826.23 Watts).
The main advantage of wiring in series is that we get a higher voltage, this enables us to use a thinner mm2 wire, while carrying the same amount of power (Watts) and also a lower voltage drop in the cable.
In our boat in this configuration with an expected cable run of 12m using our voltage drop calculator we could just use 2.5mm2 cable and still keep the Voltage drop below the 2% target. ( I suspect we would use the 4mm2 as this would give us a larger safety margin at little additional cost).
Also we find the both MPPT and PWM solar controllers are much cheaper if we use a higher voltage/lower amperage versions.
One potential disadvantage is that wired this way the two panels act as one larger panel, so if one is in the shade it will effect the total output of both panels.
Parallel Wiring the panels
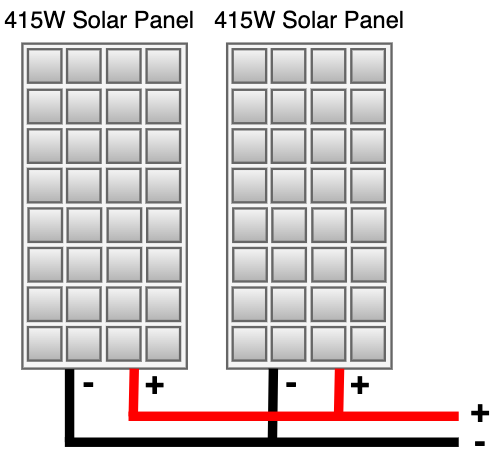
In this example below I have wired the panels in parallel so that the positives are connected together as are the negative on each panel.
Solar Panels Parallel Wiring Diagram
Again in this example these panels can output up to 38.9 Volts and 10.62 Amps, by putting them in parallel we combine the current in Amps (2 X 10.62A = 21.24A), but the Voltage stay the same at 38.9V.
Giving an output of 826 Watts (21.24 Amps X 38.9 Volts = 826.23 Watts).
In our boat in this configuration with an expected cable run of 12m using our voltage drop calculator we would need to fit a 10mm2 cable to keep the Voltage drop below the 2% requirement (This could add significant extra cost in cable and fittings).
Hybrid Serial & Parallel Configurations.
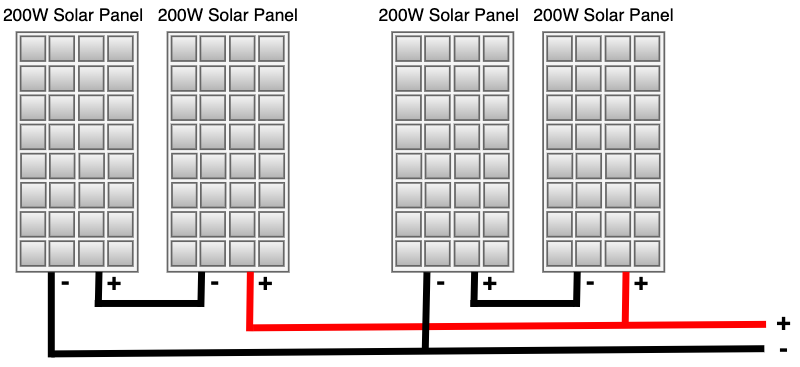
In this example we have wired 4 X 200W panels so that they connect is pairs in serial and the two pairs are connected in parallel.
Solar Panels hybrid Series & Parallel Wiring Diagram
So in this example each of these 200W panels can output up to 19.2 Volts and 10.42 Amps, by putting them together in pairs in series and then the two pairs in parallel the calculation is as follows.
We combine the two serial panels together so that we double the voltage of the pair of panels 2 X 19.2V = 38.4V while the Amps stays the same at 10.42 Amp.
Combine both sets of panels together in parallel and the Amps doubles 2 X 10.42 Amps = 20.84 Amps at 38.4V
Therefore 20.84 Amps X 38.4V = 800.25 Watts
In our boat in this configuration with an expected cable run of 12m using our voltage drop calculator we would need to fit a 10mm2 cable to keep the Voltage drop below the 2% requirement.
Things to remember
Solar panels wired in series adds there Voltages together.
Solar panels wired in parallel adds there Amps together.
Note: the circuit diagrams where drawn using Draw.io
I put this information together about our boat just after we collected it from Black Prince and forgot to publish it on the blog, so here it is finally 🙂
“Why do cables matter, they are all just the same, just copper in a plastic tube” this used to be my attitude when prototyping small electronic devices running at 5V on my bench and for 99% of the time I was right, it was not until I got involved in low power DC systems i.e. Power Over Ethernet and fibre that 48V being used as a power distribution system for networking and domestic DC power then voltage drop become an issue.
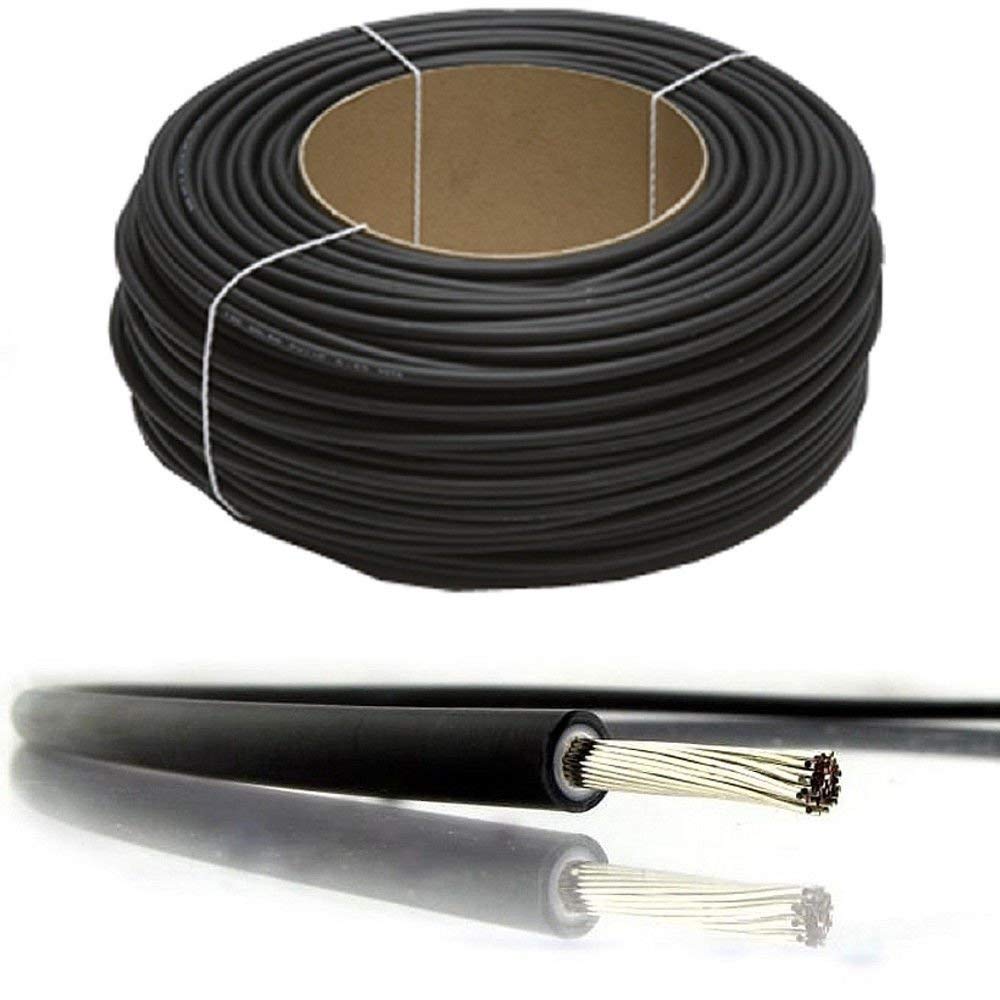
For your Solar Panel wiring, we need stranded wire so it is flexible, it needs to be tin coated so that it does not corrode, especially useful on a boat, then the jacket needs to be UV safe as it is going to be left out in the sun, while also being tough and durable as it will be bent and flexed multiple times.
Typical Solar PV Cable
Solar or PV cabling being tin coated means we are not looking at strands of copper that are directly touching each other, each wire in this case has a thin coating of the less conductive Tin, Tin is only 15% as conductive as copper. This has a very slight effect on the resistance of the wire, also being stranded we have a minimal air gap between the strands so 4mm2 of stranded copper wire is not as conducive as 4mm2 of solid copper wire.
When I have calculated the resistance of copper wire in the past I have only used the resistance of pure copper in my calculations, but now things are getting a little more complex.
When planning your install you also have to remember there is a positive and a negative cable in the circuit, so a 20m distance between your solar panels and your MPPT or PWM solar controller is really 40m of cable, so double the resistance.
To enable me to see how much the resistance of the wire changed I originally built an excel spreadsheet that took into account the resistance of the solar stranded tinned copper wire at different diameters in mm2, lucky the manufacturers only make a limited range of diameters of cable for solar systems with 2.5, 4, 6 and 10mm2 being commonly available and they provide the resistance per Km for these.
For your use, I have converted the spreadsheet into some javascript code for this page, so you can input your requirements and see the effect of that cable resistance in terms of Voltage Drop as a value and as a % will have on your plans.
Typically for this kind of DC installation you want a voltage drop of less that 2% is best.
Have a play about and see what is the best cable size/cost is best for your installation
Prototype Voltage Drop Calculator
Prototype Voltage Drop Calculator
Select cable size in
mm2
Enter cost per meter of your cable
Enter the system nominal DC voltage in volts
Enter the current draw in amps
Enter the one-way circuit length in meters
NOTE: This Voltage drop calculator is designed for Solar PV Cable, with Class 5 stranded tinned copper wire, which has a slightly higher resistance than solid copper wire.